…somewhere between the stitches…

knit.crochet.sew.craft.cook.


1 Comment

Pattern: Little Turtle Lens Buddy

little turtle lens buddy

While I was experimenting with designs for the Little Sea Turtle Lens Buddy, I wrote a pattern for one of the prototypes–a cute little turtle lens buddy made in the round. The arms, legs and head are all one piece, so there’s no need to sew all the individual pieces together. And it’s free! Enjoy!

Materials:

Small amounts of worsted weight yarn (two colors)
5.0mm crochet hook (size H)
Elastic hair tie
Tapestry needle (optional, for weaving in ends)
Safety eyes (optional)

Pattern:

Round 1: With Color A, 36 sc around the elastic hair tie. Sl st to join with first sc. [36 sc]
Crochet elastic hair tieRound 2: Ch 1. 2 hdc in 1st st. Hdc in next 3 sts. *2 hdc in next st. Hdc in next 3 sts. Repeat from * around. Sl st to join with first hdc in round. [45 hdc]
Round 3: Ch 1. 2 hdc in 1st st. Hdc in next 4 sts. *2 hdc in next st. Hdc in next 4 sts. Repeat from * around. Sl st to join with first hdc in round. [54 hdc]
Round 4: Ch 1. 2 hdc in 1st st. Hdc in next 5 sts. *2 hdc in next st. Hdc in next 5 sts. Repeat from * around. Sl st to join with first hdc in round. [63 hdc] Finish off.

Round 5: Attach Color B. Ch 1. 2 sc in 1st st. Sc in next 4 sts. Sl st in next st. Ch 2. Dc in same st. Dc in next 2 sts. Ch 2 and sl st in same st as last dc. (Bottom right leg made)
Sc in next 6 sts. 2 sc in next st. Sc in next 3 sts. Sl st in next st. Ch 2 and dc in in same st. Sc in next 2 sts. Ch 2 and sl st in same st as last dc. (Top right leg made)
2 sc in next st. Sc in next 4 sts. Sl st in next st. Ch 2 and dc in same st. Trc in next 2 sts. 2 dtr in next st. Trc in next 2 sts. Dc in next st. Ch 2 and sl st in same st as last dc. (Head made)
Sc in next 2 sts. 2 sc in next st. Sc in next 2 sts. Sl st in next st. Ch 2 and dc in same st. Dc in next 2 sts. Ch 2 and sl st in same st. (Top left leg made)
Sc in next st. 2 sc in next st. Sc in next 6 std. 2 sc in next st. Sc in next st. Sl st in next st. Ch 2 and dc in same st. Dc in next 2 sts. Ch 2 and sl st in same st as last dc. (Bottom left leg made)
Sc in next 2 std. 2 sc in next st. Sc in next 2 sts. Sl st in next. Ch 3 and trc4tog. Ch 3 and sl st in bk of 1st ch of 3 ch. Ch 3 and sl st in same st. Ch 1 and sl st to first st in round. (Tail made)

Finish off and weave in ends.

Optional: Add safety eyes to turtle’s head.


9 Comments

Pattern: Crochet Dragonfly Applique

A very talented artist and photographer friend of mine requested a flower lens buddy with a dragonfly on it. You can see her work on her blog The Dragonfly Whispers My Name, and I highly recommend her if you live in Seoul and are searching for a family photographer! Here’s a photo she recently took of my family:

Marisa Johnson Photography


So for someone so creative and talented, I really couldn’t just make her any ‘ole dragonfly. I used the Flower Lens Buddy pattern and started experimenting with dragonflies!

flower and dragonfly lens buddy

The first one I made (on the white flower w/ pink center) looked a bit too much like a butterfly, so I elongated both the body and the wings. There was quite a bit of crocheting and frogging going on… But the result is a dainty little dragonfly appliqué pattern for your crocheting pleasure!

crochet dragonfly applique

Materials:

Worsted weight yarn
4.5mm (size G) crochet hook
Tapestry needle (for sewing pieces together and weaving in ends)

**You may use other weights of yarn an appropriately sized hooks**

Finished Dimensions:

With worsted weight yarn and 4.5mm crochet hook: 5.5 inch wingspan x 3 inches tall
With DK weight yarn and 4.0mm crochet hook: 4.5 inch wingspan x 2.5 inches tall

Pattern:

Body: Ch 16. Work all the stitches in the back bar only. Dc in 3rd ch from hook. Dc in next ch. Hdc in next 5 ch. Sc in next 4 ch. Sl st in next 3 ch. Finish off.

dragonfly tutorial

dragonfly tutorial 2

Top Wings (make 2): Ch 10. Work the following stitches in the back loops only of the foundation chain. Sl st in 2nd ch from hook. Sl st in next ch. Sc in next 2 ch. Hdc in next 2 ch. Dc in next 2 ch. 6 dc in last ch. As you work the 6 dc in the last ch, the back loop of the last ch will open/loosen up. Simply pull the tail from the beginning of the foundation chain to close the hole. Then turn the piece 180 degrees and work the following stitches in the front loops only of the foundation chain. Dc in next 2 ch. Hdc in next 2 ch. Sc in next 2 ch. Sl st in last 2 ch. Finish off, leaving a long tail to sew the wings onto the body.

dragonfly tutorial 3

Bottom Wings (make 2): Ch 7. Work the following stitches in the back loops only of the foundation chain. Sl st in 2nd ch from hook. Sc in next 2 ch. Hdc in next 2 ch. 6 hdc in last ch. Then, turn the piece 180 degrees and work the following stitches in the front loops only of the foundation chain. Hdc in next 2 ch. Sc in next 2 ch. Sl st in last ch. Finish off, leaving a long tail to sew the wings onto the body.

Construction Notes: Sew the top wings onto the body, being careful to sew onto the yarn on the back of the body so that the yarn from the wings does not show through on the front of the body piece. As you sew the bottom wings onto the body, also sew the top edge of the bottom wings to the bottom edge of the top wings for stability.

Weave in all your ends and you’re done!


9 Comments

Crochet Lens Buddy Pattern Giveaway! {limited offer}

UPDATE: The giveaway is now closed! Thanks to everyone for your interest in my patterns! I’m working on some new patterns and will have a limited free offer for those soon so stay tuned! 

I’ve been busy this past week finalizing a few patterns for sale, and they’re finally up and available (on Etsy, Craftsy and Ravelry). However, for 10 lucky readers, I’m offering all five of the lens buddy patterns for free! All you have to do is follow this blog (either via email, WordPress, or Bloglovin’) AND “like” my Facebook page.

The patterns include:

So just follow, like and send me an email at juliastitches @ me.com with your email address! If you already follow this blog and like the jkwdesigns page on Facebook, just drop me a line and tell me so. The first 10 people to do so will receive all 5 of the patterns–a $12.50 value!


4 Comments

Pattern: Mugunghwa, the National Flower of Korea

mugunghwa crochet pattern

This flower pattern was written in memory of those who lost their lives aboard the Sewol off the South Korean coast on the morning of April 16, 2014. The mugunghwa, or the Rose of Sharon, is the national flower of Korea, and it has long held significance in Korean history and culture. Koreans have treasured the mugunghwa flower for centuries, and its name stems from the word mugung, which means immortality. The flower is incredibly resilient, so as the national flower, it reflects the enduring spirit, the perseverance and the determination of the people and culture.

But mostly, I just wanted to make something beautiful during this dark time… And as I worked on this, I thought about the stories of the heroes that have emerged like Park JiYoung, Kim KiWoong, and Jeong HyunSeon–people who gave bravely and selflessly. They truly are the epitome of what the mugunghwa flower symbolizes. Their spirit endures…

Materials:

Small amount of worsted weight yarn (in 2 colors for flower and yellow for stamen)
4.00mm crochet hook (size G)
tapestry needle

A note on colors: While the flower can be made in a variety of colors of your choice, the mugunghwa that serves as the Korean national flower is the dansim variety, which has a dark pink or red center. It is most commonly found in light pink with a dark pink/red center or in white with a dark pink/red center. Other varieties are the baekdal (pure white) and the yeesadal (pale pink flower with darker pink specks on the petals).

Flower Pattern:

Round 1: With Color A, make a magic loop and make 5 sc in the loop. Pull yarn tightly to close hole. Do not cut yarn.

Round 2: Attach Color B to beginning of round and ch 5. Sl st in next sc to join. Continue to Ch 5 and sl st in next sc until you reach beginning of round. Last sl st should be in the beginning sc. Finish off and cut yarn.

Round 3: In Round 3, you will be making individual petals, one at a time, while continuing to work in the round, eliminating the need to sew individual petals onto the center.

Row 1 of petal: With Color A, sc in back loop only of each of the 5-ch. [5 sc] Ch 1 and turn.
Row 2 of petal: Sc in first 2 st. 2 sc in next st. Sc in last 2 st. [6 sc] Ch 1 and turn.
Row 3 of petal: Sc in first 2 st. 2 sc in next st. Sc in last 3 st. [7 sc] Ch 1 and turn.
Row 4 of petal: Sc in first 3 st. 2 sc in next st. Sc in last 3 st. [8 sc] Ch 1 and turn.
Row 5 of petal: Sc in first st. Dc in next st. Sl st in next st. Ch 2. Dc in next 3 st. Ch 2 and sl st in same st as last dc. Dc in next st. Sc in last st. Sl st evenly down left side of the petal (4 sl st). The last sl st should be at the bottom of the petal.
Petal complete.

Continue on to the next petal by returning to the next 5-ch and beginning again with Row 1 of petal. Repeat the petal pattern 4 more times and complete the flower with a sl st in the first st of the first petal.

mugunghwa tutorial

1) View of work once Round 2 is complete. 2) Sc into back loops only of each 5-ch. 3) View of work once one petal is complete. 4) View of work once all 5 petals are complete (prior to sewing down petals and adding stamen).


Finish off and leave a long tail to pin the petals in place. The petals overlap one another on one side, creating a slight swirl of petals as they emerge from the center of the flower. Using a tapestry needle, simply stitch the petals in place on the back of petals. Weave in ends.

Stamen:

Ch 11. 2 sc in 2nd ch from hook. 2 sc in each ch. Finish off, leaving a long tail to stitch stamen to center of flower. The piece that you have just made will curl in on itself. Carefully tighten the coil and use the tail to stitch the coil together so that it remains coiled. Sew onto the center of the flower. Weave in ends.

IMG_7367

mugunghwa


6 Comments

Pattern: Flower Lens Buddy

flower lens buddy

I have several wonderfully talented photographer-friends, which is great for someone who loves to make things for babies and young children. In addition to all the adorable photo props I’ve made for them and their tiny clients, they’ve been requesting some camera-specific items, the camera buddy or lens buddy being one of them. I currently have several in the works, and eventually, the patterns will be available for purchase, but here’s a pattern for one I whipped up for a friend. It’s quick and easy, and such a great way to get little ones to LOOK AT THE CAMERA!!! 😉

Materials:

Small amounts of worsted weight yarn (two colors)
5.0mm crochet hook (size H)
Elastic hair tie
Tapestry needle (optional, for weaving in ends)

Pattern:

With Color A (for center of flower)
Round 1: 36 sc around the elastic hair tie. Sl st to join with first sc. [36 sc]

Crochet elastic hair tie

Round 2: Ch 1. 2 hdc in 1st sc. Hdc in next 3 sc. *2 hdc in next sc. Hdc in next 3 sc. Repeat from * around. Sl st to join with first hdc. [45 hdc] Finish off and cut yarn.

With Color B (for petals)
Round 3: Attach yarn. Ch 1. *Sc in 1st, 2nd and 3rd st. Ch 2, turn. Dc in 1st st (the 3rd sc you just made before turning). 2 dc in next st. Dc in 3rd st. Ch 2, turn. Dc2tog 2 times. Sl st evenly down the left side of the petal, making the last sl st at the base of the first petal. One petal made. Moving on to the next st in the round, continue from * and repeat around until you reach the end. [15 petals] Sl st to beginning st of 1st petal to join. Finish off and weave in ends.


2 Comments

Yellow Ribbons for Sewol

For the past week, my heart–like so many others–has been broken into a million pieces as I watched the news and read countless stories about the tragedy that hit South Korea. The world watched in horror as hundreds of children died, and I wept as I imagined how scared they must have been, how their parents waited helplessly as hope of rescue faded. Even as we celebrated Easter with our friends and family and as I took my kids to the playground and to T-ball practice, my thoughts continued to return to those lives lost and the parents who are currently living their worst nightmare.

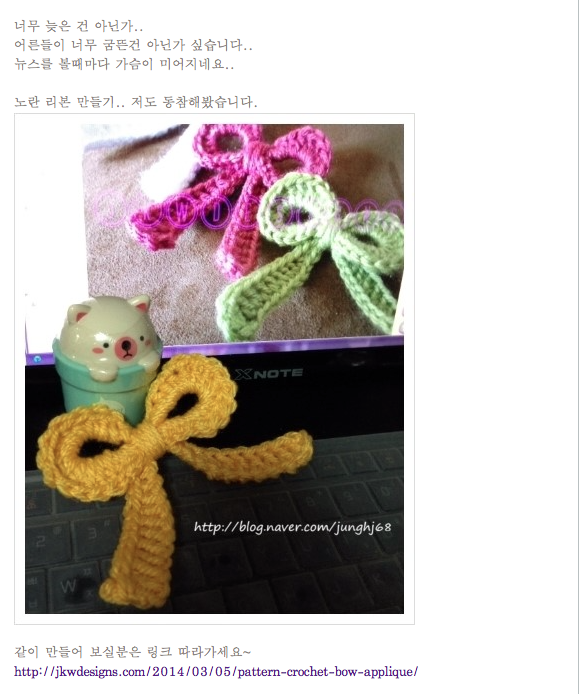
The past several days, I’ve been thinking about somethinganything I could do… And I’ve felt so helpless. I’m in the process of writing a pattern for the national flower of Korea, the mugunghwa, or the Rose of Sharon. It’s nothing really in the grand scheme of things… But this morning, I noticed that there was suddenly a MASSIVE spike in visitors to my site from Korea, specifically to my ribbon appliqué pattern. I did some searching, and the visitors were directed to my blog from a Korean knitting forum as well as a couple of Korean knitting blogs. My ribbon pattern is now being used to make yellow ribbons in memory of those who died on the Sewol.

Ribbons for SewolThe pattern has also been translated into Korean.

I’m both honored and heartbroken.

If you use my pattern, I ask that you make one in yellow and say a prayer so that those who perished, those who lost loved ones, and those who survived may find peace.


2 Comments

Pattern: Simple Flower with Layered Petals

free flower pattern

I like knitting and crocheting things in as few pieces as possible, mainly because I really hate hand-sewing. And weaving in ends. This flower is very similar to the Quick and Easy 5 or 6 Petal Flower pattern, but you’ll be adding a round of chains to the back of the previous round’s petals to add layers. Sounds way more complicated than it is. Just check out the pics to see how it’s done!

This flower can be made with any weight yarn and an appropriate crochet hook. With worsted weight yarn and a size 4.5 mm crochet hook, the flower is approximately 3 inches across.

Crochet Flower w/ Layered Petals

©jkwdesigns – This pattern is for personal or charitable use only. Please do not repost or distribute the pattern, and please link back to this pattern page if you share your lovely little bow creations on your website or blog. Thank you!

Round 1: Begin with a magic loop/magic circle. Depending on the number of petals you would like on your flower, sc 5 or 6 (or more!) into the magic loop. Pull tightly to close loop. Sl st to join with first sc in round.

magic loop

Round 2: Ch 2. 2 dc, ch 2 and sl st into the first sc. *Ch 2. 2 dc, ch 2 and sl st into the next sc. Repeat from * until you reach the end of the round.

crochet flower

Round 3: You will be creating the “base” for your next round of petals. Ch 1. Sc into the BACK of the first petal by inserting the hook under a strand of yarn from EACH of the 2 double crochets of the first petal. The reason for grabbing 2 strands is to prevent pulling on one stitch and deforming the petal as you work around. *Ch 2, sc into the back of the next petal. Repeat from * until you reach the beginning of the round. Sl st to join with the 1st sc.

crochet flower

Round 4: This round creates the 2nd round of petals. *Ch 2. In ch-2 space: 4 dc, ch 2, sl st to join. Repeat from * in the next ch-2 space until you reach the beginning of the round.

crochet flowercrochet flower

Round 5: This round creates the base for the 3rd round of petals. Ch 2. Sc into the back of the first petal of round 2. *Ch 3, sc into the back of the next petal. Repeat from * until you reach the beginning of the round. Sl st to join with the 1st sc.

crochet flower

Round 6: This round creates the 3rd round of petals. *Ch 2. In ch-3 space: 2 dc, 2 trc, 2 dc, ch 2, and sl st to join. Repeat from * in the next ch-3 space until you reach the beginning of the round.

crochet flower

Finish off and weave in ends.

If you’d like to make your flower larger and more elaborate, just add petals and extra layers!

crochet flower

For extra petals:

In round 1, add an extra sc for each additional petal. If you would like a 7 petal flower, make 7 sc. For an 8 petal flower, make 8 sc. I don’t recommend making more than 8 petals as the more petals you add, the more the petals curl in on themselves. Continue with the rest of the pattern.

For extra layers:

After round 6, you will need to make an additional base round for the next round of petals. Also, the petals in each subsequent round need to be larger than the petals in the previous round. So in the 7th round, ch 4 between each sc into the back of each petal. Then, in round 8, you’ll want to ch 2, 2dc, 4trc, 2dc, ch 2, and sl st to join in each ch-4 space for each petal.

For each subsequent layer of petals, make the ch-space longer by one chain, then add 2 trc to the petal.


4 Comments

Pattern: Quick and Easy 5 or 6 Petal Flower

I’ve been making this quick and easy flower for years now. It’s a great way to use up scraps, and it’s a cute appliqué for headbands, baby booties, and with a hair clip and some glue, it’s adorable in little girls’ hair!

All you need is a small amount of scrap yarn and an appropriate crochet hook for the yarn. It can be made in any weight. I personally love tiny little flowers and use fingering yarn or dk weight yarn with a 3.0mm or 3.5mm crochet hook, but I’ve made them with worsted weight yarn as well with great results.

IMG_6724

Quick and Easy 5 or 6 Petal Flower Pattern

©jkwdesigns – This pattern is for personal or charitable use only. Please do not repost or distribute the pattern, and please link back to this pattern page if you share your lovely little bow creations on your website or blog. Thank you!

Begin with a magic circle/magic loop (to learn how to make a magic circle, which is wonderful for anything crocheted in the round–hats, flowers, amigurumi, etc., check out this video tutorial). All of the stitches are made in the magic loop: *Ch 2, 2dc, ch 2, sl st in magic loop. Repeat from * 4 more times for a 5 petal flower and 5 more times for a 6 petal flower. Fasten off and weave in ends (or leave a long tail if you plan to sew it onto something).

That’s it! It really is that easy!


13 Comments

Pattern: Crochet Applique Ribbon Bow

In preparation for a spring bazaar that I will be selling at, I’ve been busy cranking out flowers, bows, and hearts to adorn cute, little heads. I worked up this super simple little bow and thought I’d share. It’s quick and easy and a great way to get rid of those tiny little balls of scrap yarn your husband keeps asking you throw away. 😉

bow applique

Applique Ribbon Bow Pattern

©jkwdesigns – This pattern is for personal or charitable use only. Please do not repost or distribute the pattern, and please link back to this pattern page if you share your lovely little bow creations on your website or blog. Thank you!

Materials: (suggested)
4.5mm crochet hook
worsted weight yarn (small amount)
* You can use any weight yarn and appropriate hook for this pattern. With a 4.5mm hook and worsted weight yarn, my bows measured approx. 3.25 in. across and 3.75 in. from top to bottom.

The bow is constructed in two pieces. The looped part is an oval shape, and the dangling ribbons will be slightly V-shaped when complete.

Oval Shape:
Ch 20. Sl st in 1st ch to create a loop.

IMG_6662
Ch 1. All of the following stitches are made INTO the loop, not in individual chains, so in the large loop that you’ve just made, create 2sc, 3 hdc, 8dc, 3hdc, 4sc, 3hdc, 8dc, 3hdc, and 2sc. (As you’re making the stitches, you may need to gently slide your stitches over on the loop so that you have enough room to make all of these stitches.)

IMG_6663

Sl st with 1st sc to join. Finish off, leaving a long tail (approx. 20 inches).

IMG_6664

Dangling Ribbons:
Ch 26. Dc in 3rd ch from hook. Dc in next 7 ch. Hdc in next 2 ch. Sc in next 4 ch. Hdc in next 2 ch. Dc in next 7 ch. Ch 2 and sl st with foundation ch of the last dc. Finish off. Weave in ends.

IMG_6665

Bow Construction:
Hold the oval shape so that the stitches are evenly distributed and the beginning/ending sc are at the top, middle. Hold the top and bottom center of the oval together, and hold the center of the dangling ribbons behind the pinched oval.

IMG_6666

IMG_6667

Use the long tail you left attached to the oval shape to wind around the center of the bow multiple times. Tie securely. Weave in ends. That’s it!

You can attach these cute little bows to hair barrettes/clips, headbands, scarves, purses… So much more useful than tiny balls of leftover yarn that you have no idea what to do with!

Happy Crocheting!


1 Comment

Iron Man Faceplate Pattern

As promised… Here’s the FREE pattern for the Iron Man hat faceplate. Please keep in mind that this pattern in ONLY for the faceplate. There are many free patterns available online for simple crochet hats. For best results, use a pattern that uses bulky yarn or two strands of worsted weight yarn held together.

Please feel free to make as many Iron Man hats as you’d like with this pattern, but kindly link back to this post/my blog if you post photographs of your Iron Man hats online.

Hope you enjoy!

The PDF can be downloaded here: